


My Christmas Dessert Centrepiece
A Glorious Mint Chocolate Torte

🎄Previously this was an exclusive recipe available only to paid subscribers, but as a Christmas treat I’ve brought it out from behind the paywall, to show you the sort of content paid subscribers get regularly. If you want more like this sign up for a paid subscription today! Merry Christmas🎄
Do I have something special for you today? Well yes, the answer is yes. Would be a strange way to start the newsletter if the answer was no! This year, and I know this will sound strange for someone whose job is quite literally spending all of my time in the kitchen, me and my partner will be hosting Christmas for the very first time, and that means cooking my first ever Christmas dinner. I have always treated Christmas as a bit of a break, I spend all year in the kitchen, baking as much as humanly possible, and as I have parents who love hosting, and have the work of making Christmas for everyone drilled down, like a well oiled machine, I have always taken the opportunity to hang up my oven gloves and enjoy the break. That’s not to say I did nothing to help out, boxing day brunch is usually my offering, pancakes or French toast for the whole family, I’m also often on cocktail duty and a dessert normally makes an appearance too. This year, however, it is entirely on us (although mum, if you’re reading this some homemade mincepies wouldn’t go amiss).
For the meal itself, we are going traditional, a roast Turkey with all the trimmings. For dessert however, I took the opportunity to riff a little and make something that is both spectacular in looks and taste (humble brag but its true) but also relatively simple to pull together. Christmas is always busy, but this year it will be extra stressful because not only do I have a book deadline for Jan 10th, we are also due to move house, finally, in the same week, what perfect timing! So it’s not as if we can be in full relaxation mode. Because of that, the dessert, the cake, is pretty straightfoward.
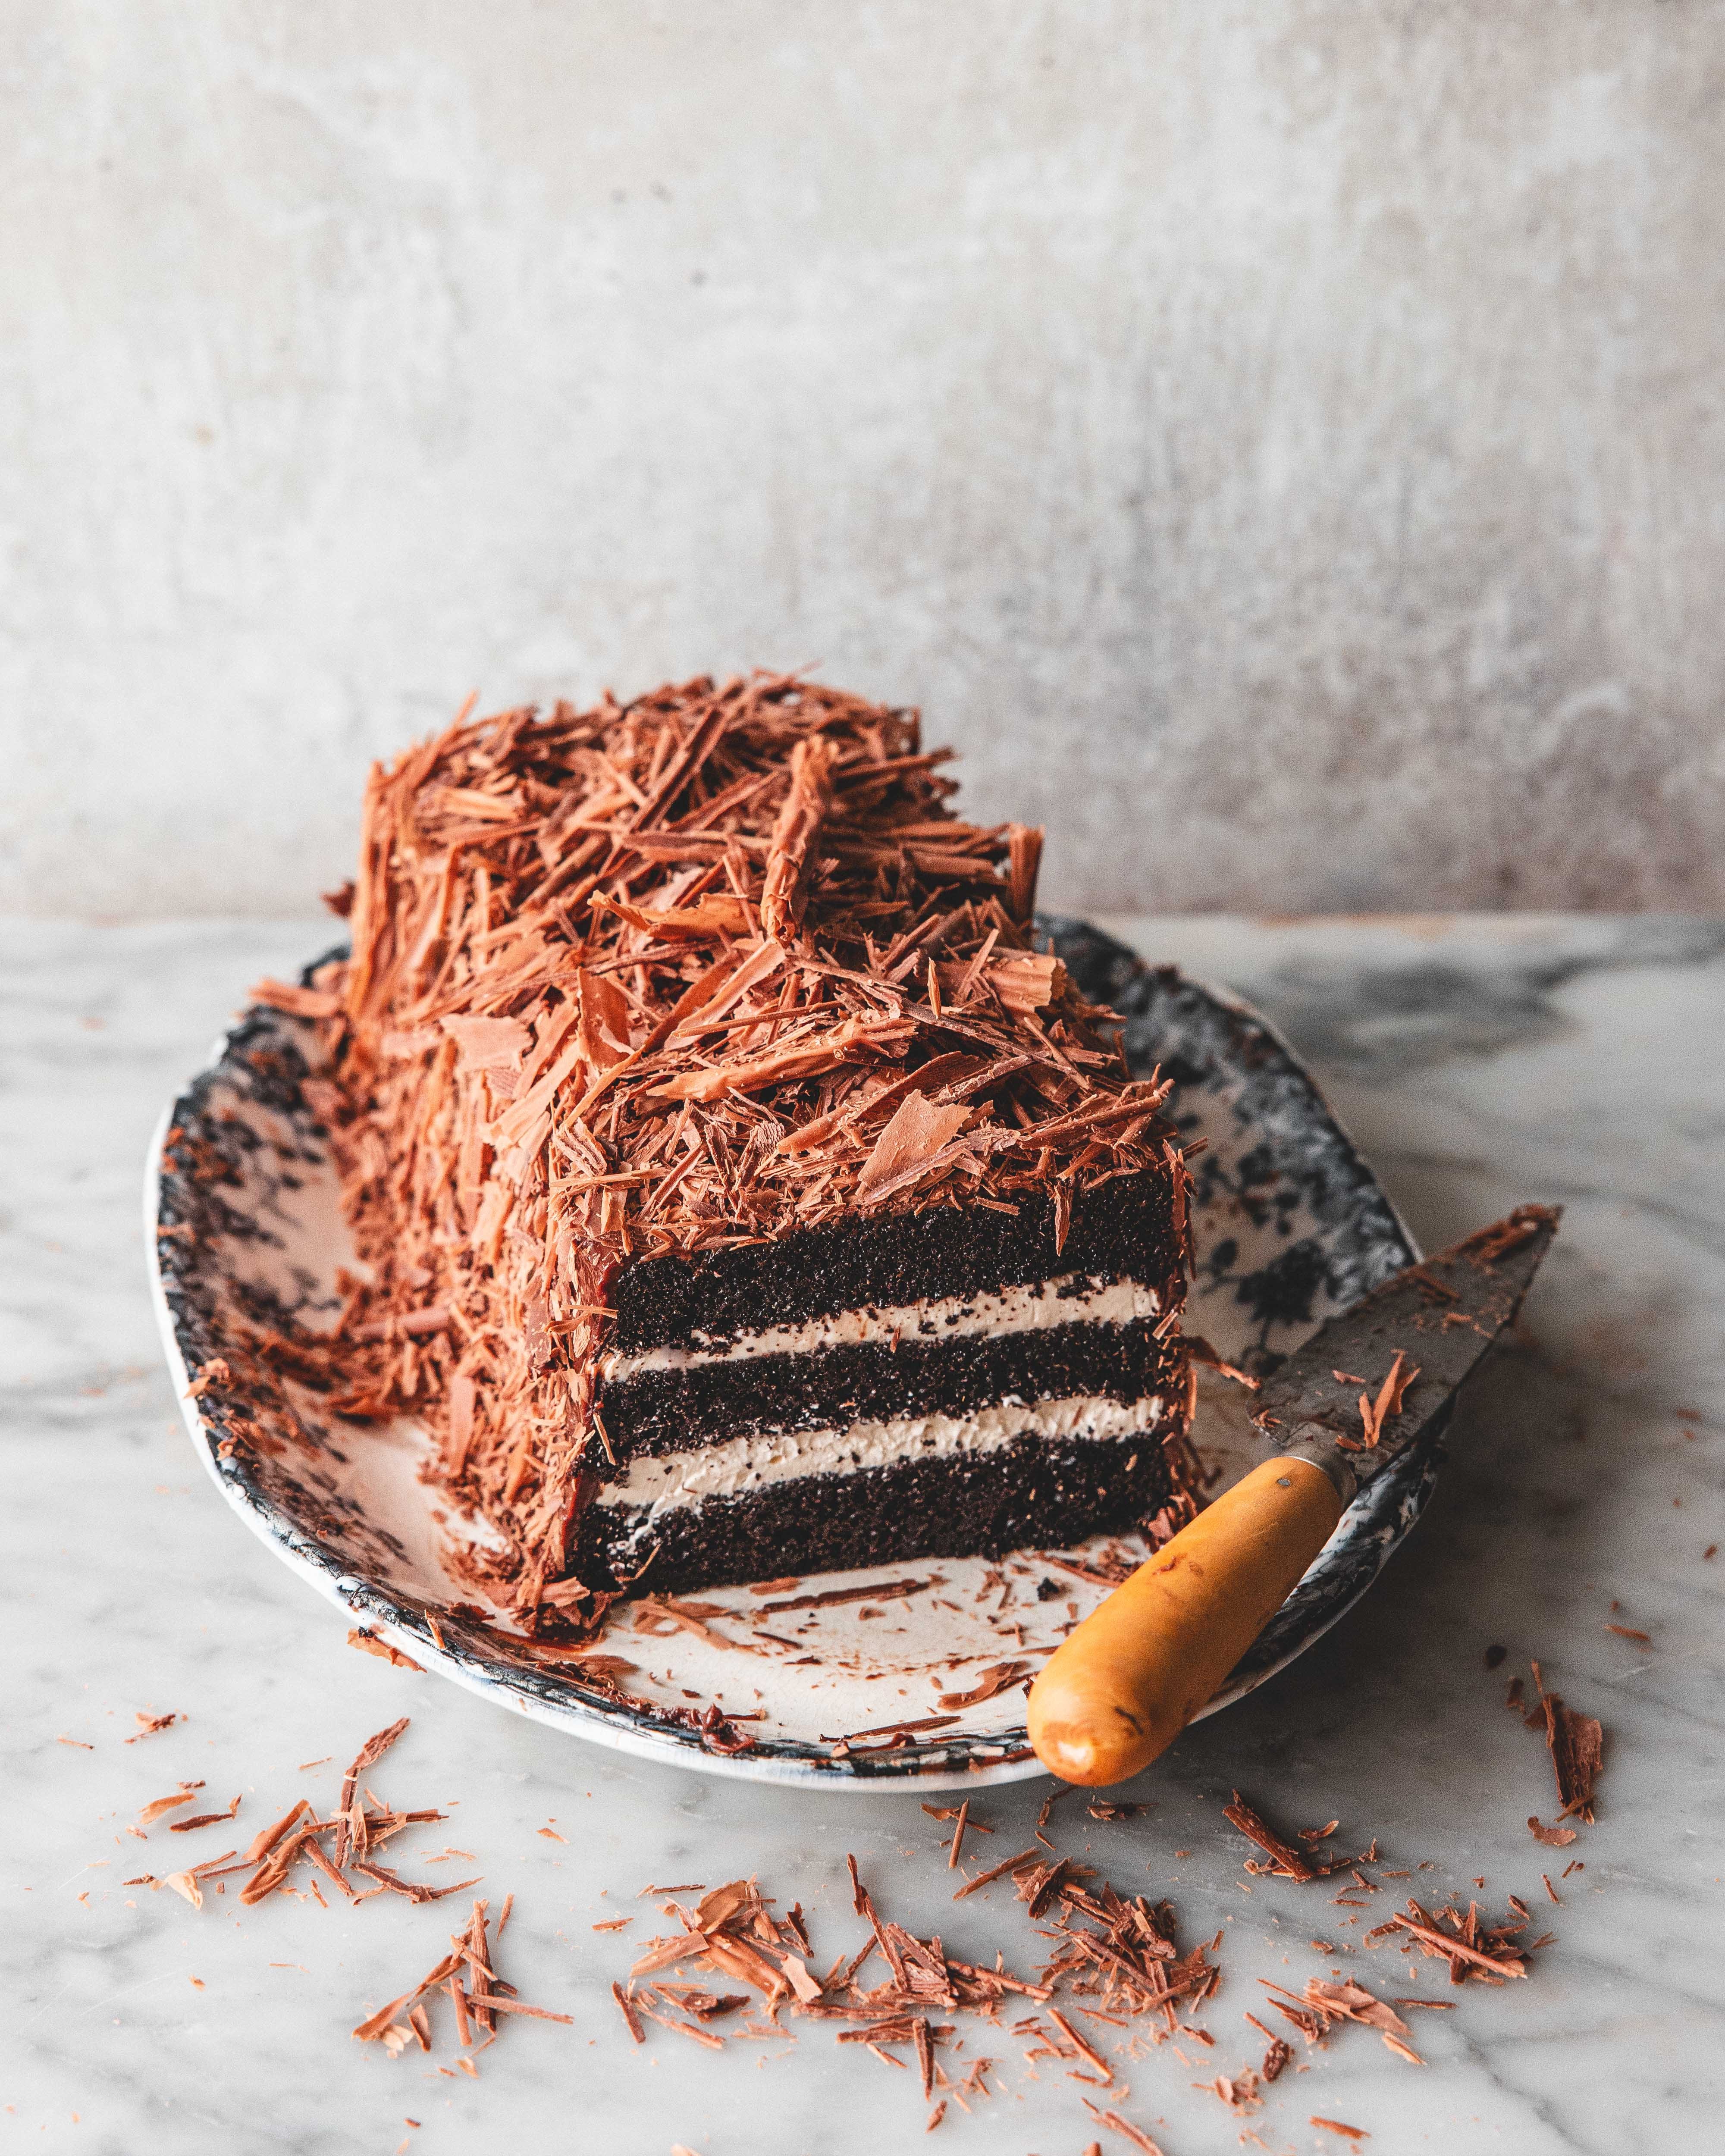
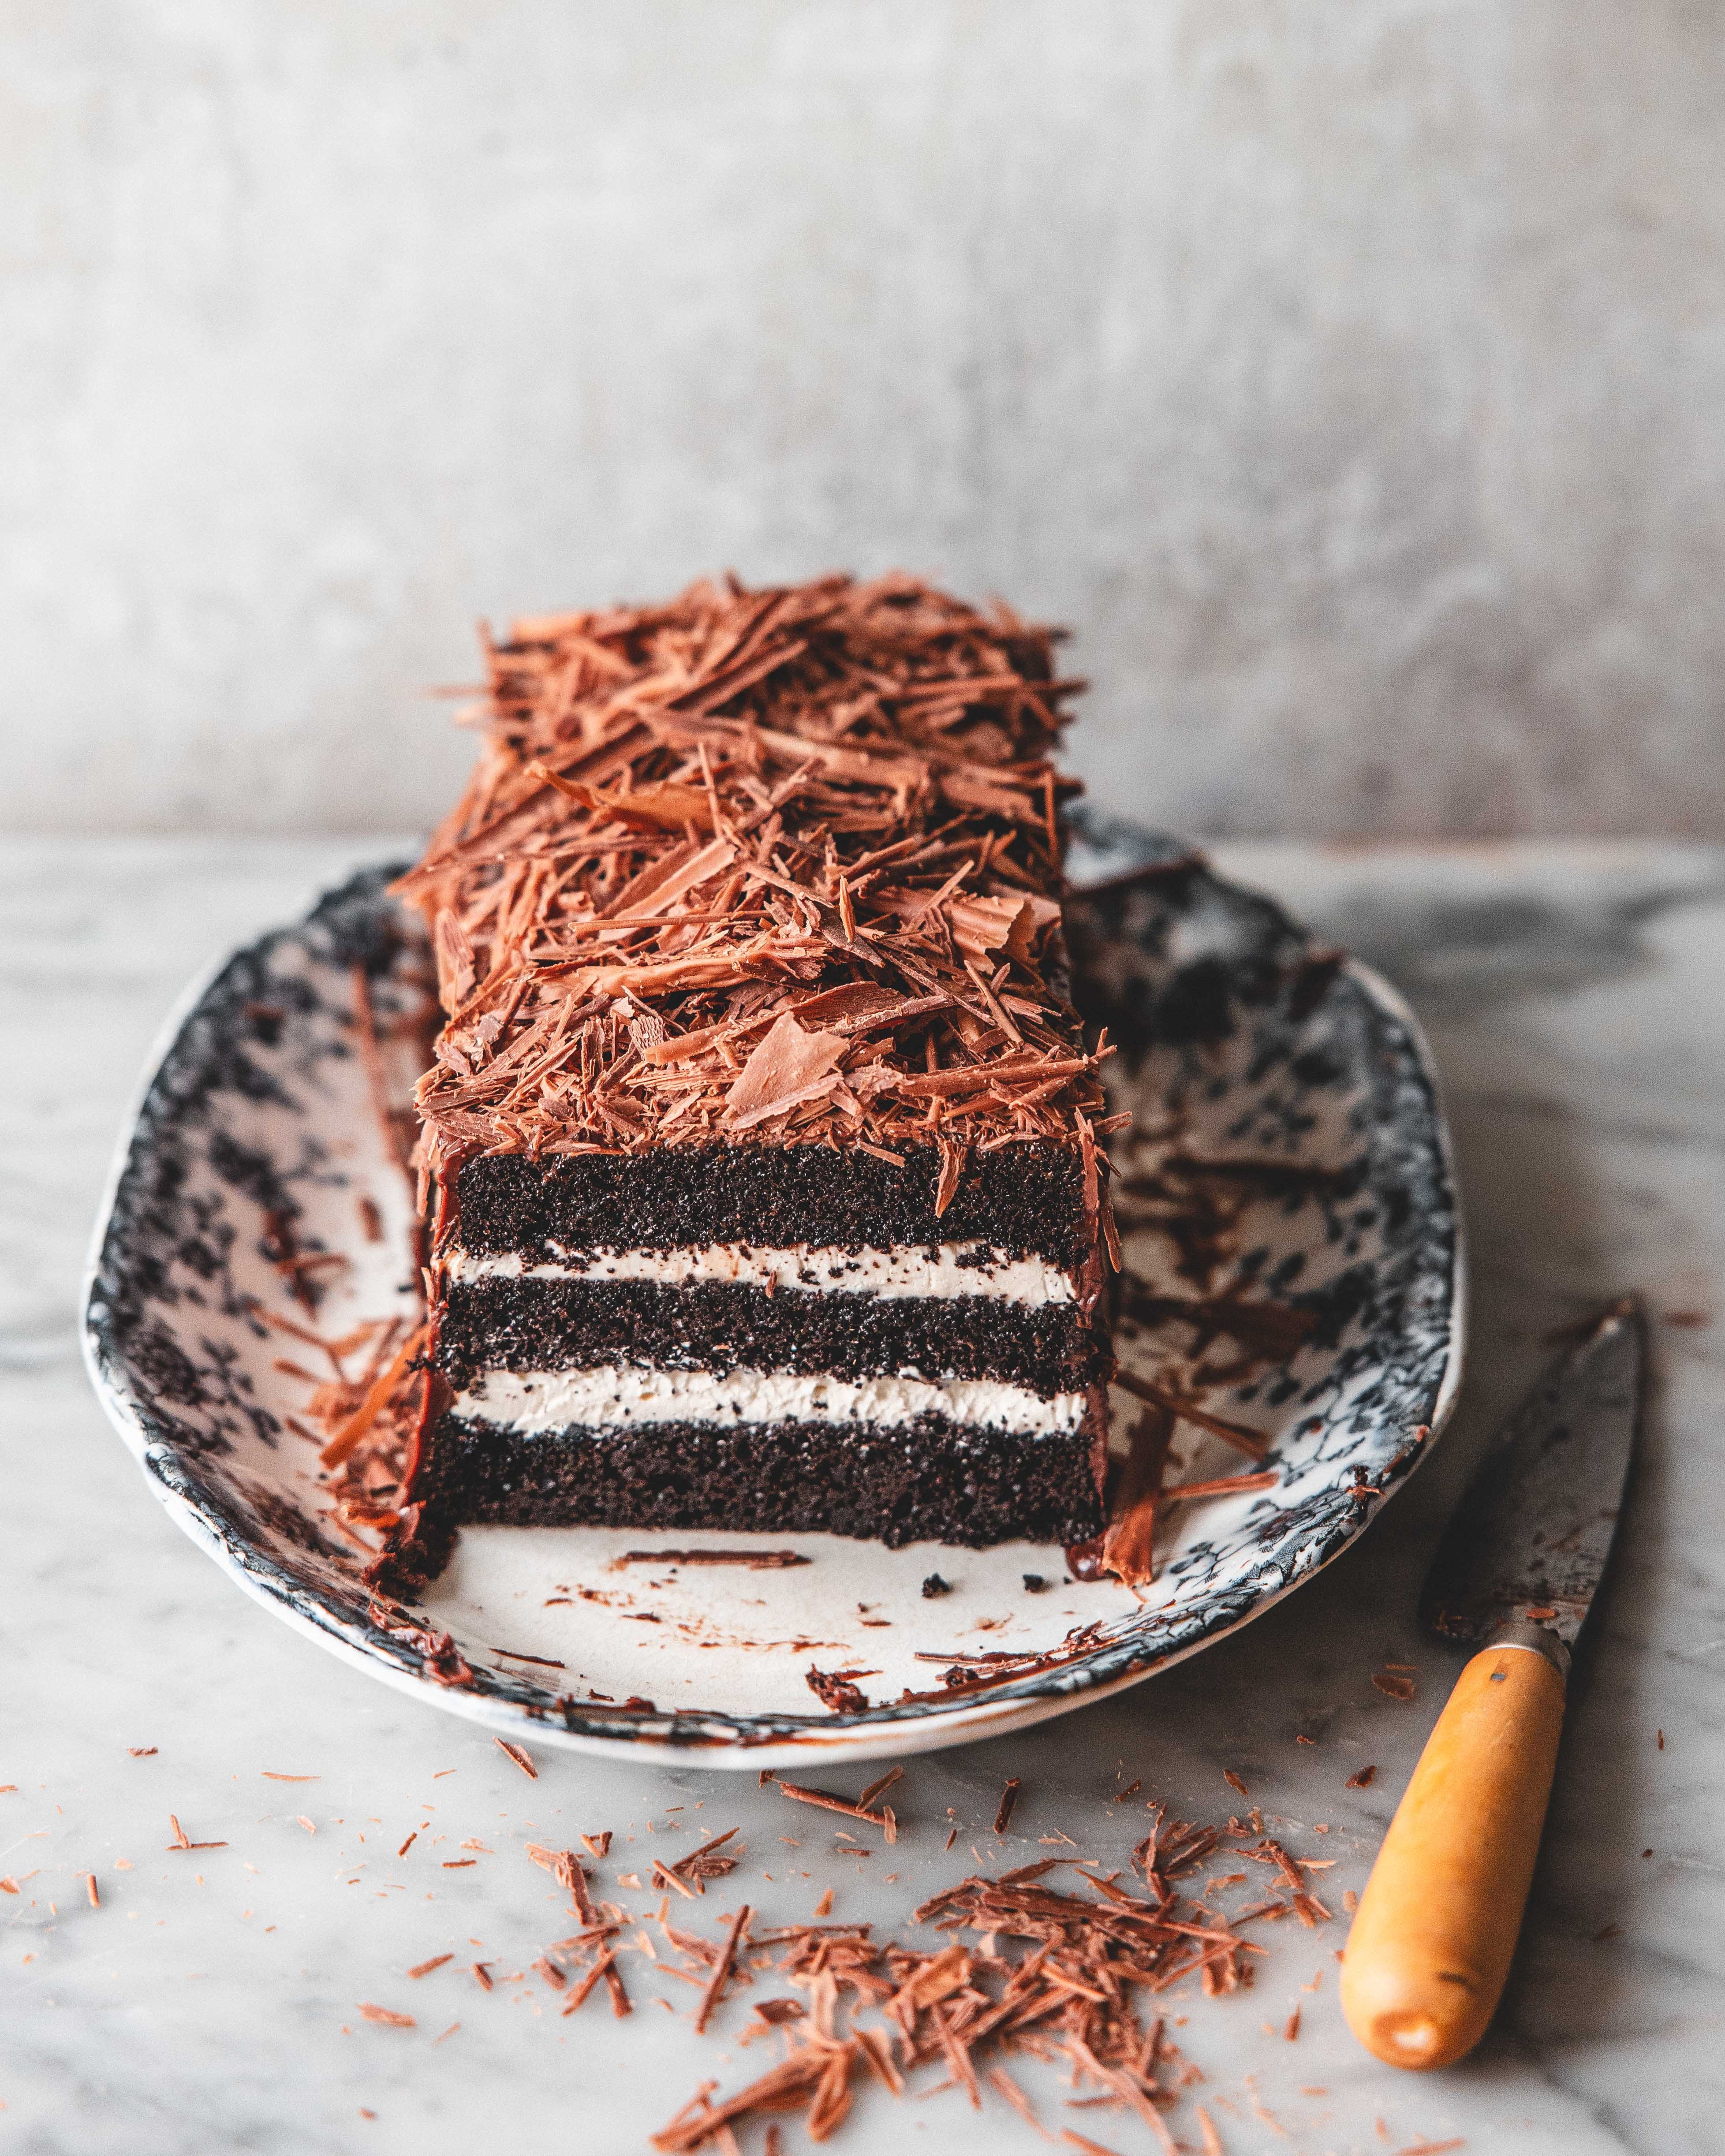
The cake element is a simple wet into dry method, just about the simplest method for making cakes there is. The filling is a modified whipped cream, made with mascarpone and peppermint extract. To decorate you just need to make a little bit of ganache and some chocolate shavings. Okay, maybe that is sounding like a bit more work than I promised, but its all relatively low effort stuff I swear. There are also plenty of places you can prepare ahead. The cake, can be made at least a couple days in advance or you could make it now and freeze it. If you want, you can also make the chocolate shavings ahead of time and refrigerate them until needed. Once assembled the cake will also keep in the fridge for a few days so there is no stress and no need to make it on the day.
Christmas Mint Chocolate Torte
Serves 8-10
165g plain flour
3/4 tsp baking powder
1 1/4 tsp bicarbonate of soda
1/2 tsp fine sea salt
50g cocoa powder
200g light brown sugar
135ml boiling water
80g unsalted butter, melted
120g sour cream
2 large eggs
Cocoa Nib Simple Syrup
50g caster sugar
75ml water
1 tbsp cocoa nibs
Peppermint Mascarpone Whipped Cream
175ml double cream, chilled
75g mascarpone, chilled
1 tbsp light brown sugar
1/2 tsp vanilla bean paste
1/2 tsp peppermint extract
Ganache
100g dark chocolate
100ml double cream
1/2 tbsp golden syrup
Chocolate Shavings
100g milk chocolate
Preheat the oven to 180ºC (160ºC Fan). Lightly grease a standard 1lb loaf pan and line with a stripe of parchment that extends over the long sides of the pan, securing it in place with a couple metal binder clips.
To make the cake add the flour, baking powder, bicarbonate of soda and salt to a large bowl and whisk together. Add the cocoa powder and sugar to a separate bowl and pour over the boiling water and the melted butter, stirring together to combine. Give the mixture a really good whisk to ensure there are no lumps of cocoa and the sugar has dissolved. Adding the hot water to the cocoa in this manner is called blooming and helps to bring out all of the flavour in the cocoa. Add the sour cream, whisking briefly to combine, then add the eggs, whisking until the mixture is smooth and fully combined. Pour the wet goods into the dry and use the whisk to stir together until smooth. Keep this stirring action to a minimum, too much and the cake will end up tougher than is desired. Pour the cake batter into the prepared loaf pan.
Bake in the preheated oven for about 45-50 minutes or until the cake springs back to a light touch and a skewer inserted into the middle of the cake comes out clean. Remove and set aside to cool for 10 minutes before using the strip of parchment as a sling to carefully remove the cake from the tin, setting onto a wire rack to cool completely.
Once cooled you can freeze the cake for up to a month or wrap in clingfilm and store at room temp for up to three days.
To make the simple syrup add all of the ingredients to a small saucepan and bring to a simmer and then cook for 2-3 minutes or until the mixture has reduced slightly. Set aside and leave to infuse for an hour or so before straining off the cocoa nibs. If you don’t have cocoa nibs you can leave them out of this element but I think it adds a great depth to the cake, instead make a plain simple syrup of 50ml water and 50ml sugar, bringing just to a simmer before removing from the heat.
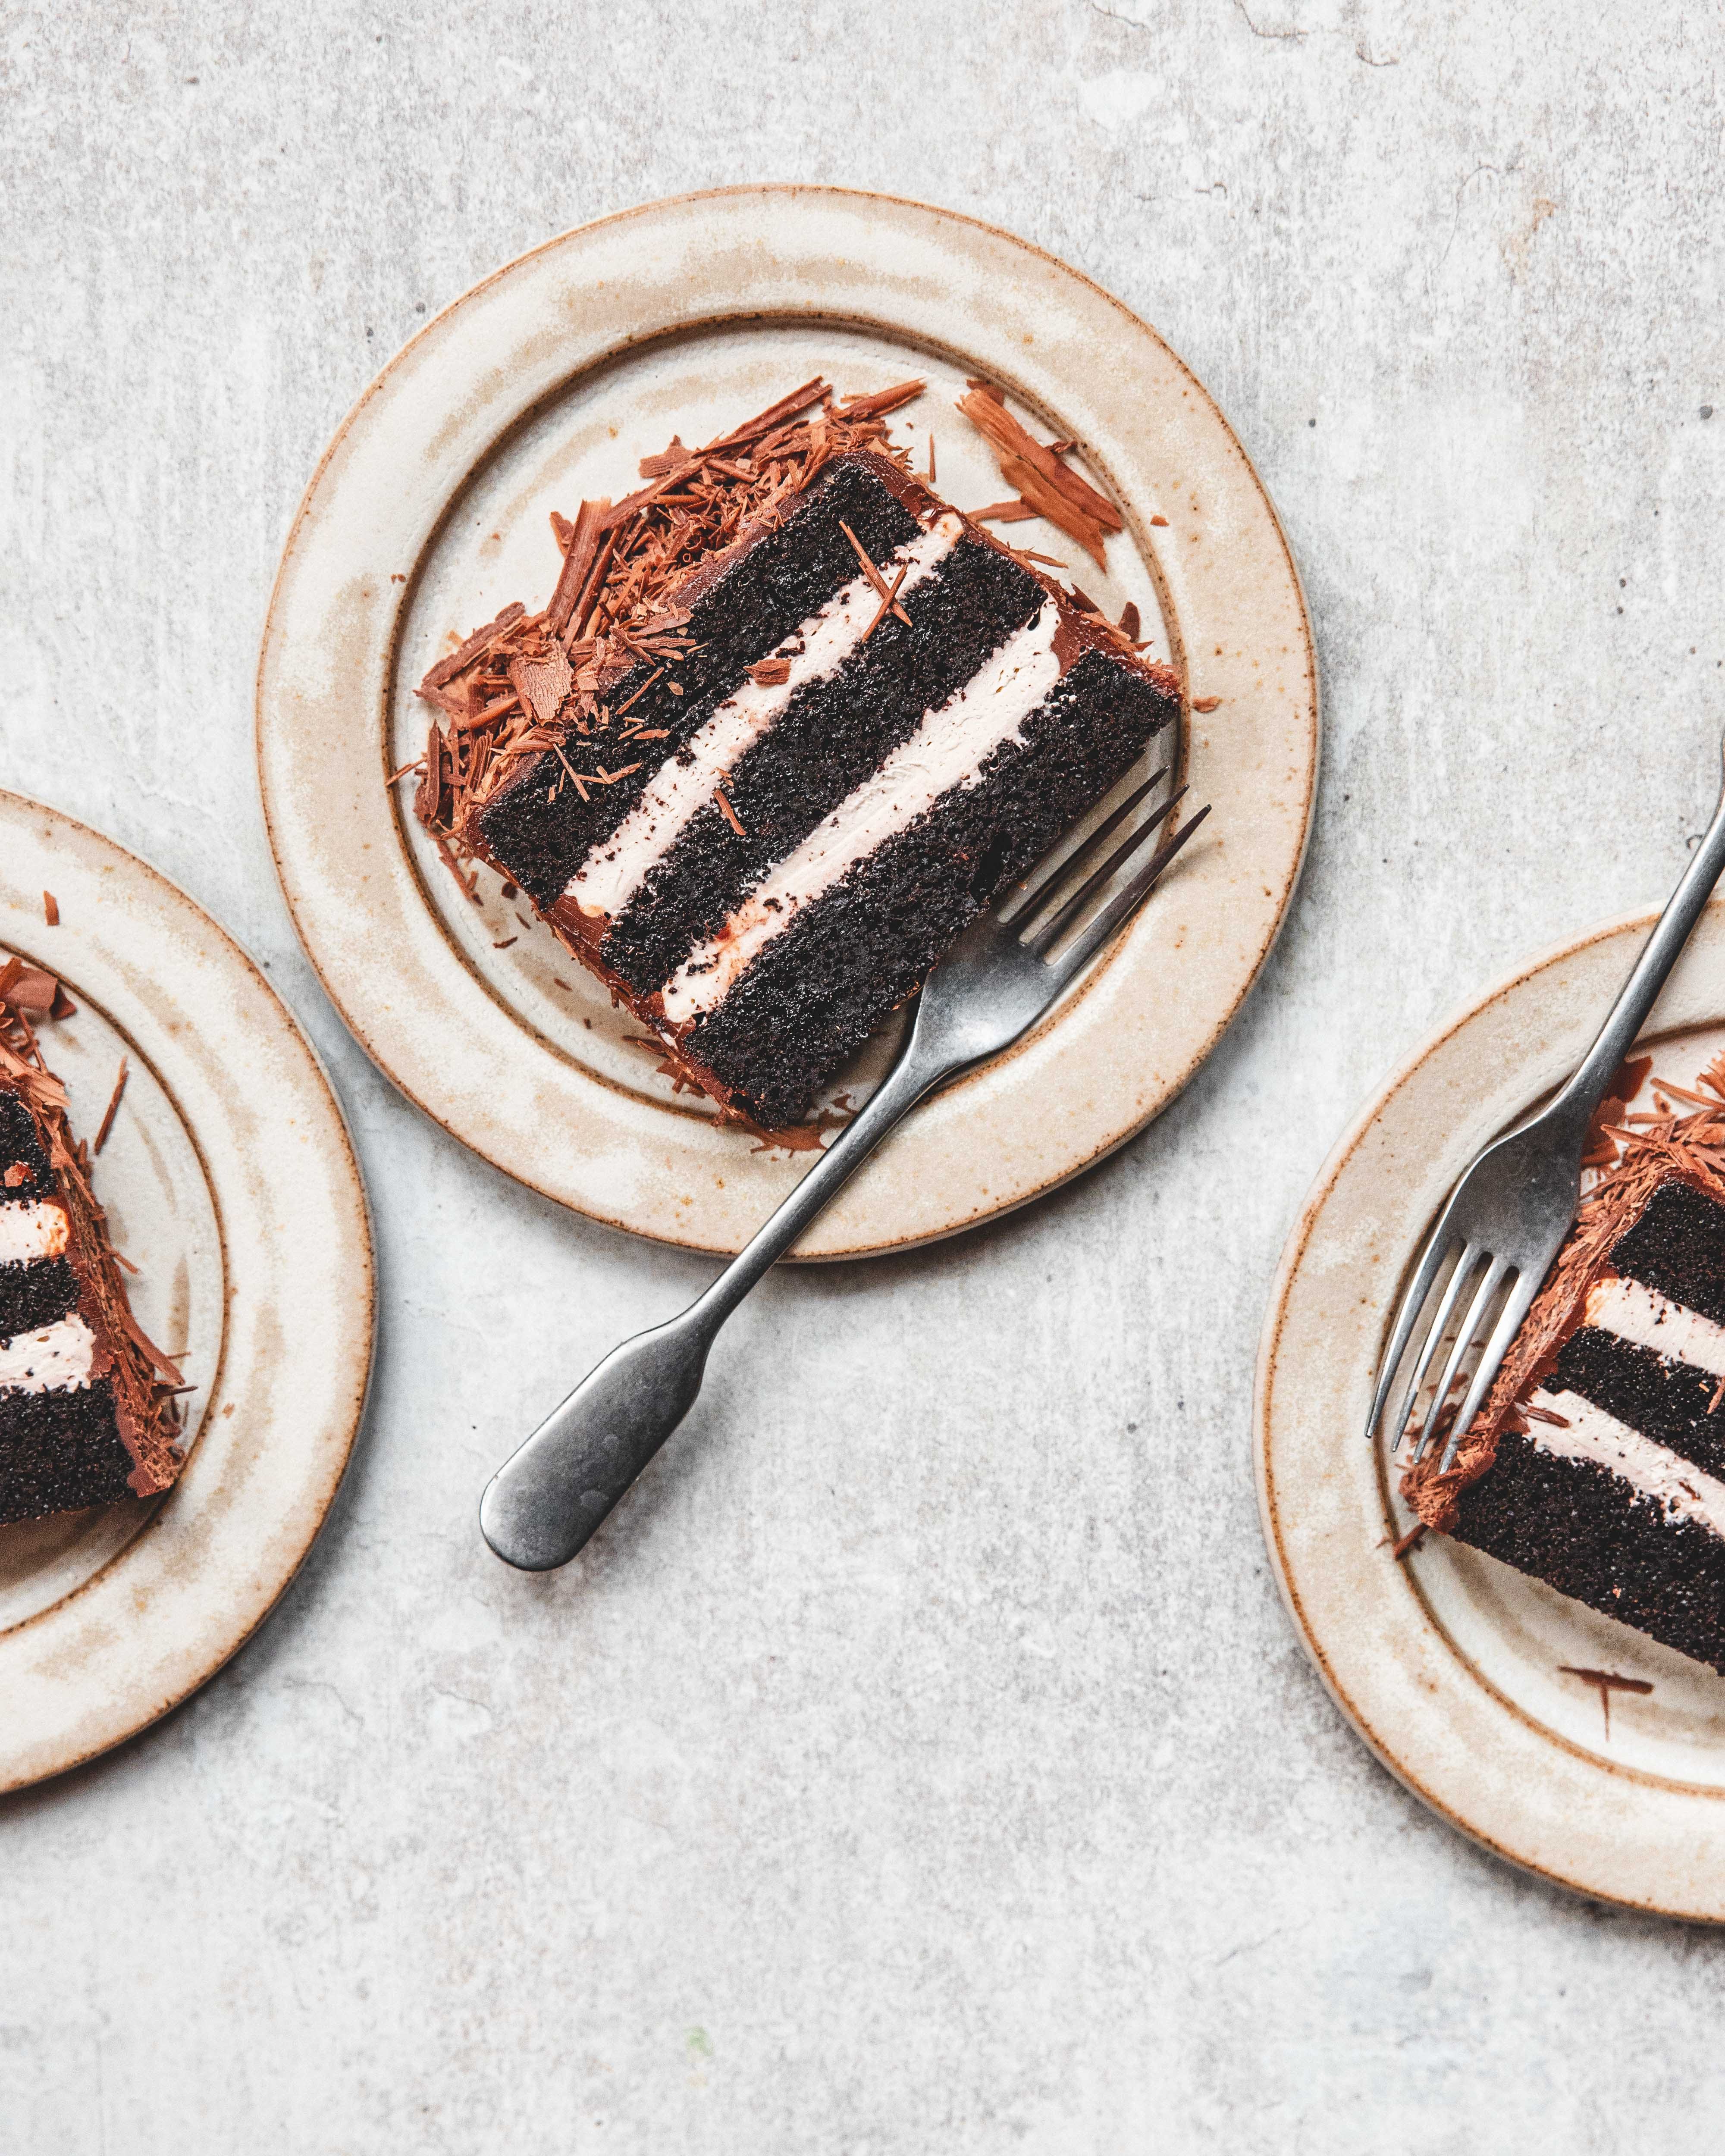
To assemble the cake, use a serrated knife to slice any domed top from the cake, so that both the top and bottom of the cake are nice and flat. Slice the cake into three thin layers. Add the ingredients for the mascarpone cream into a large bowl and using a balloon whisk, whip until holding a medium peak. When making this sort of cream you need to be careful because the mascarpone can make this mixture stiff and grainy quite easily, hence why I use a balloon and not electric whisk. Place the bottom layer of cake onto a serving platter and brush generously with the syrup and then spread half of the cream mixture on top of the cake. Place the middle cake layer on top and repeat the process. For the final layer of cake brush the cut side with the syrup and then turn cut side down on top of the assembled cake. Refrigerate the cake whilst you make the garnishes.
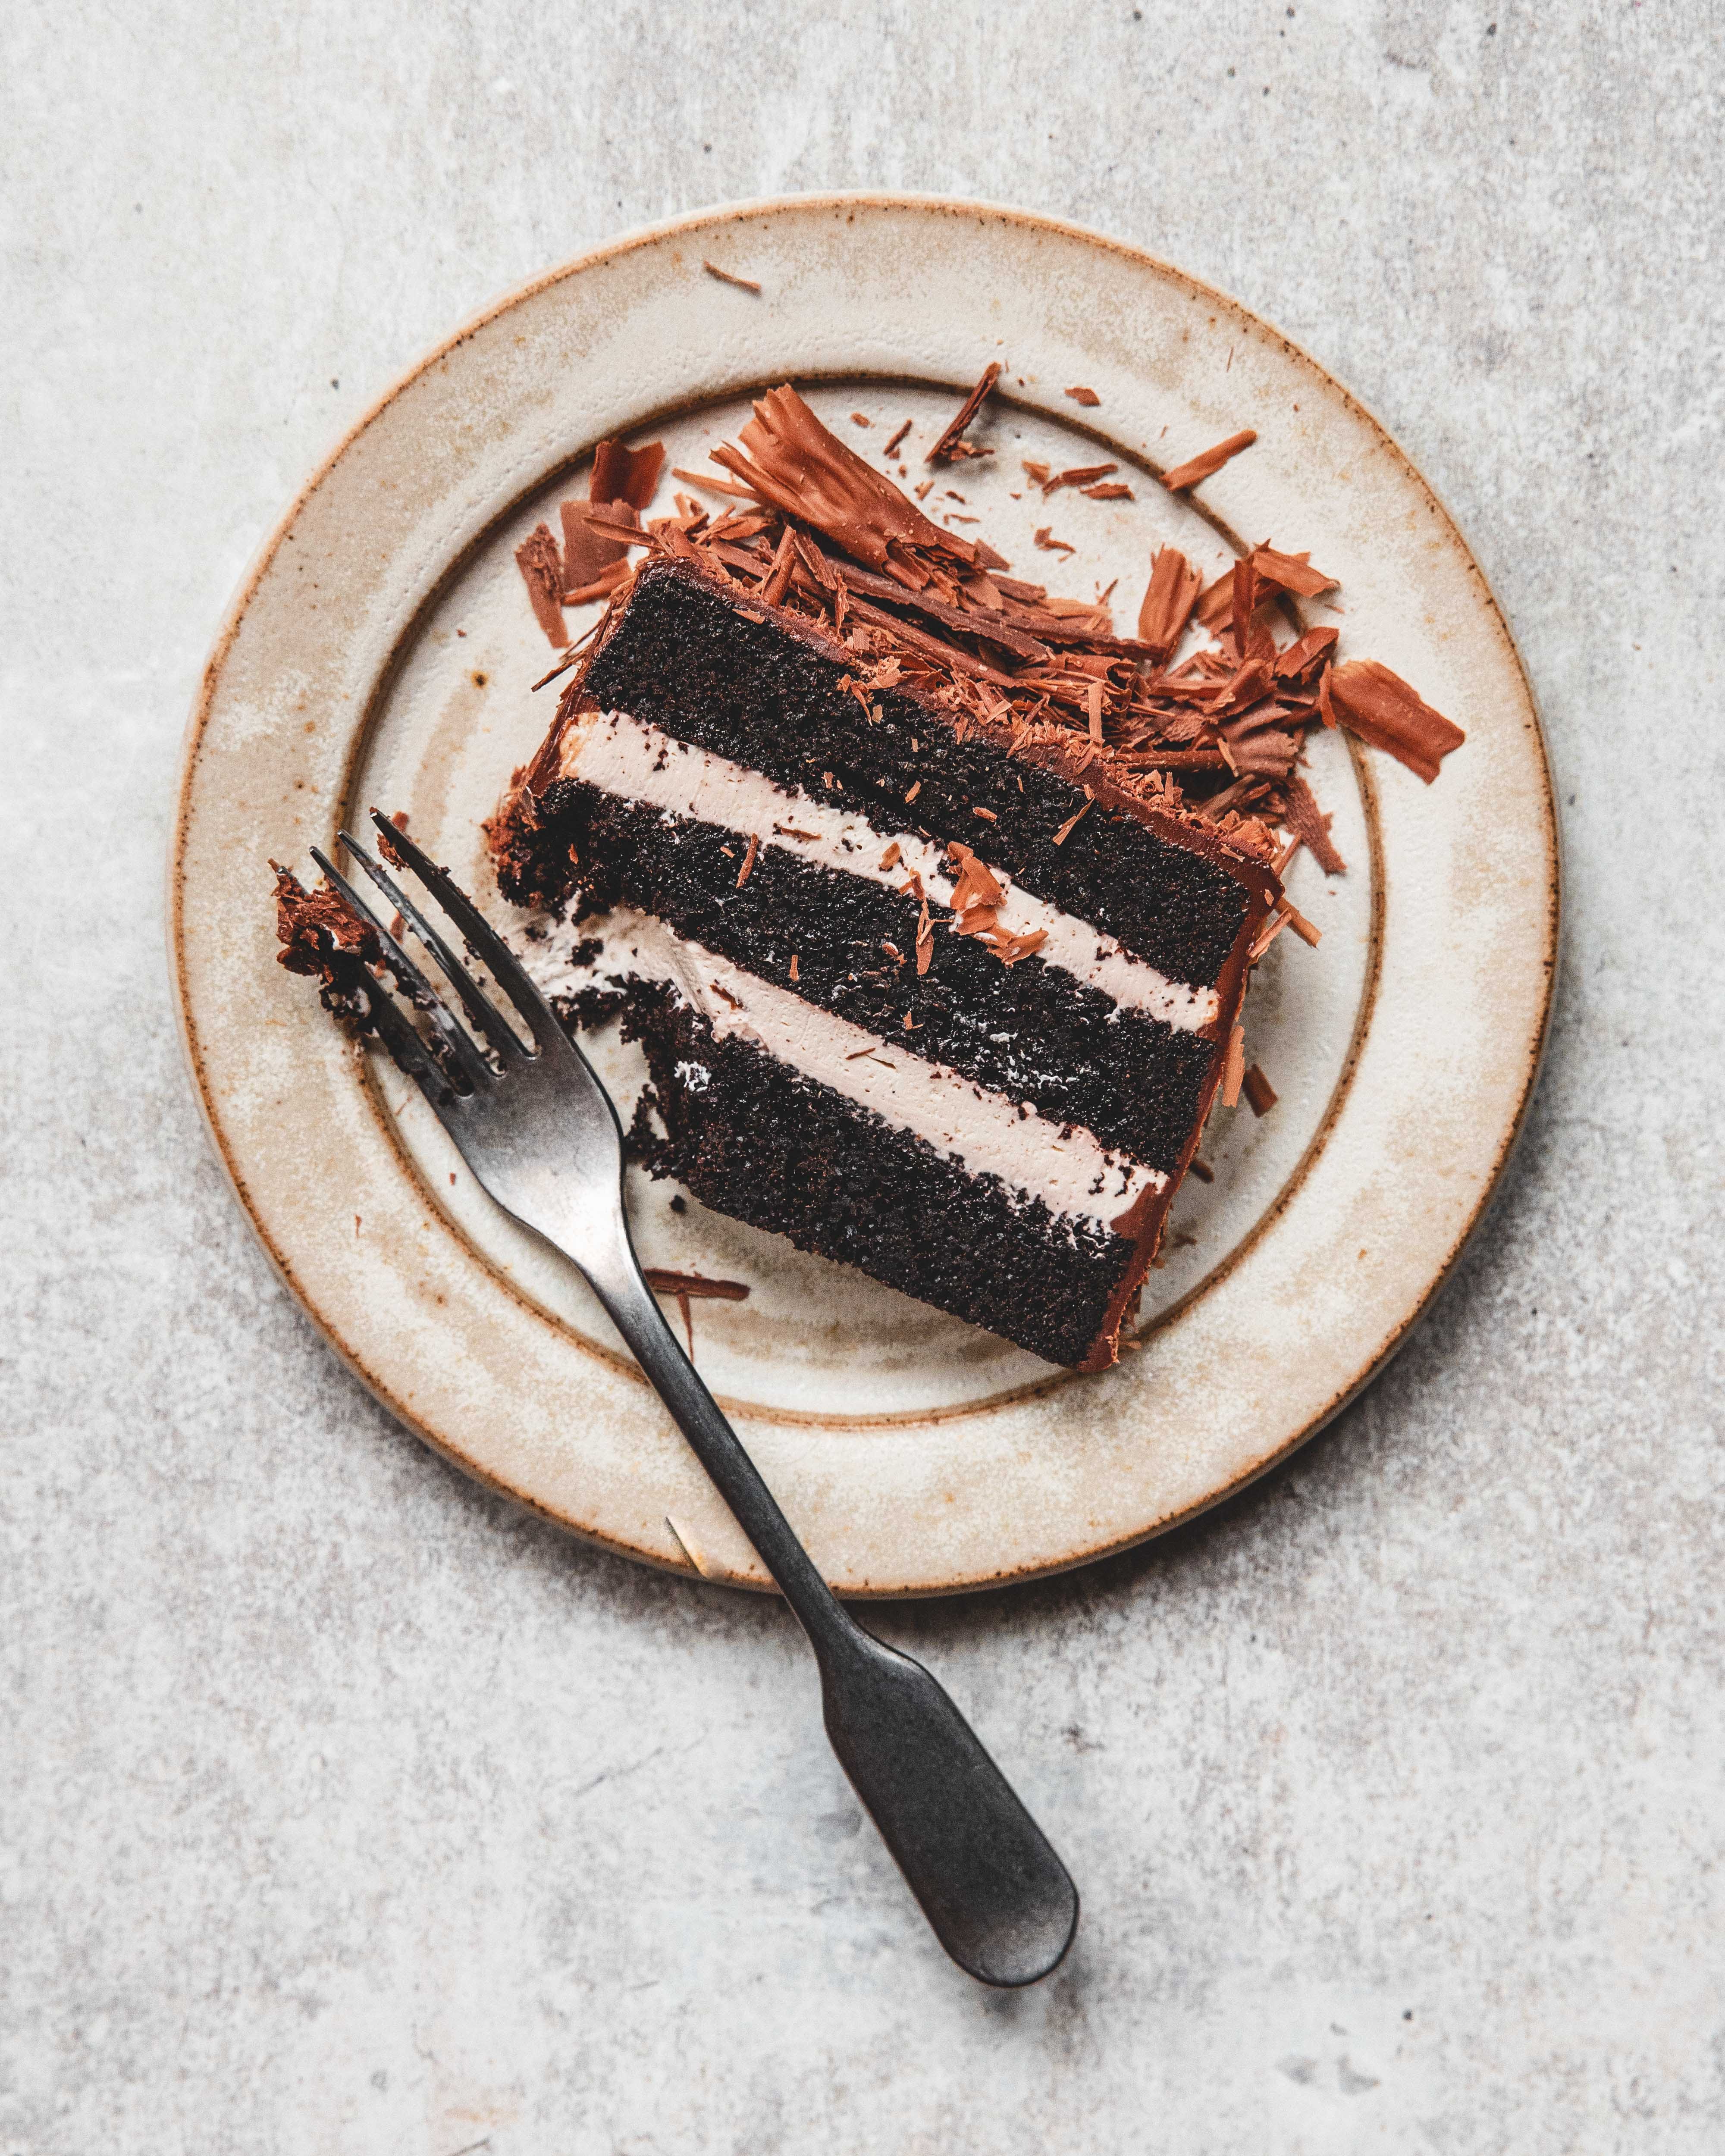
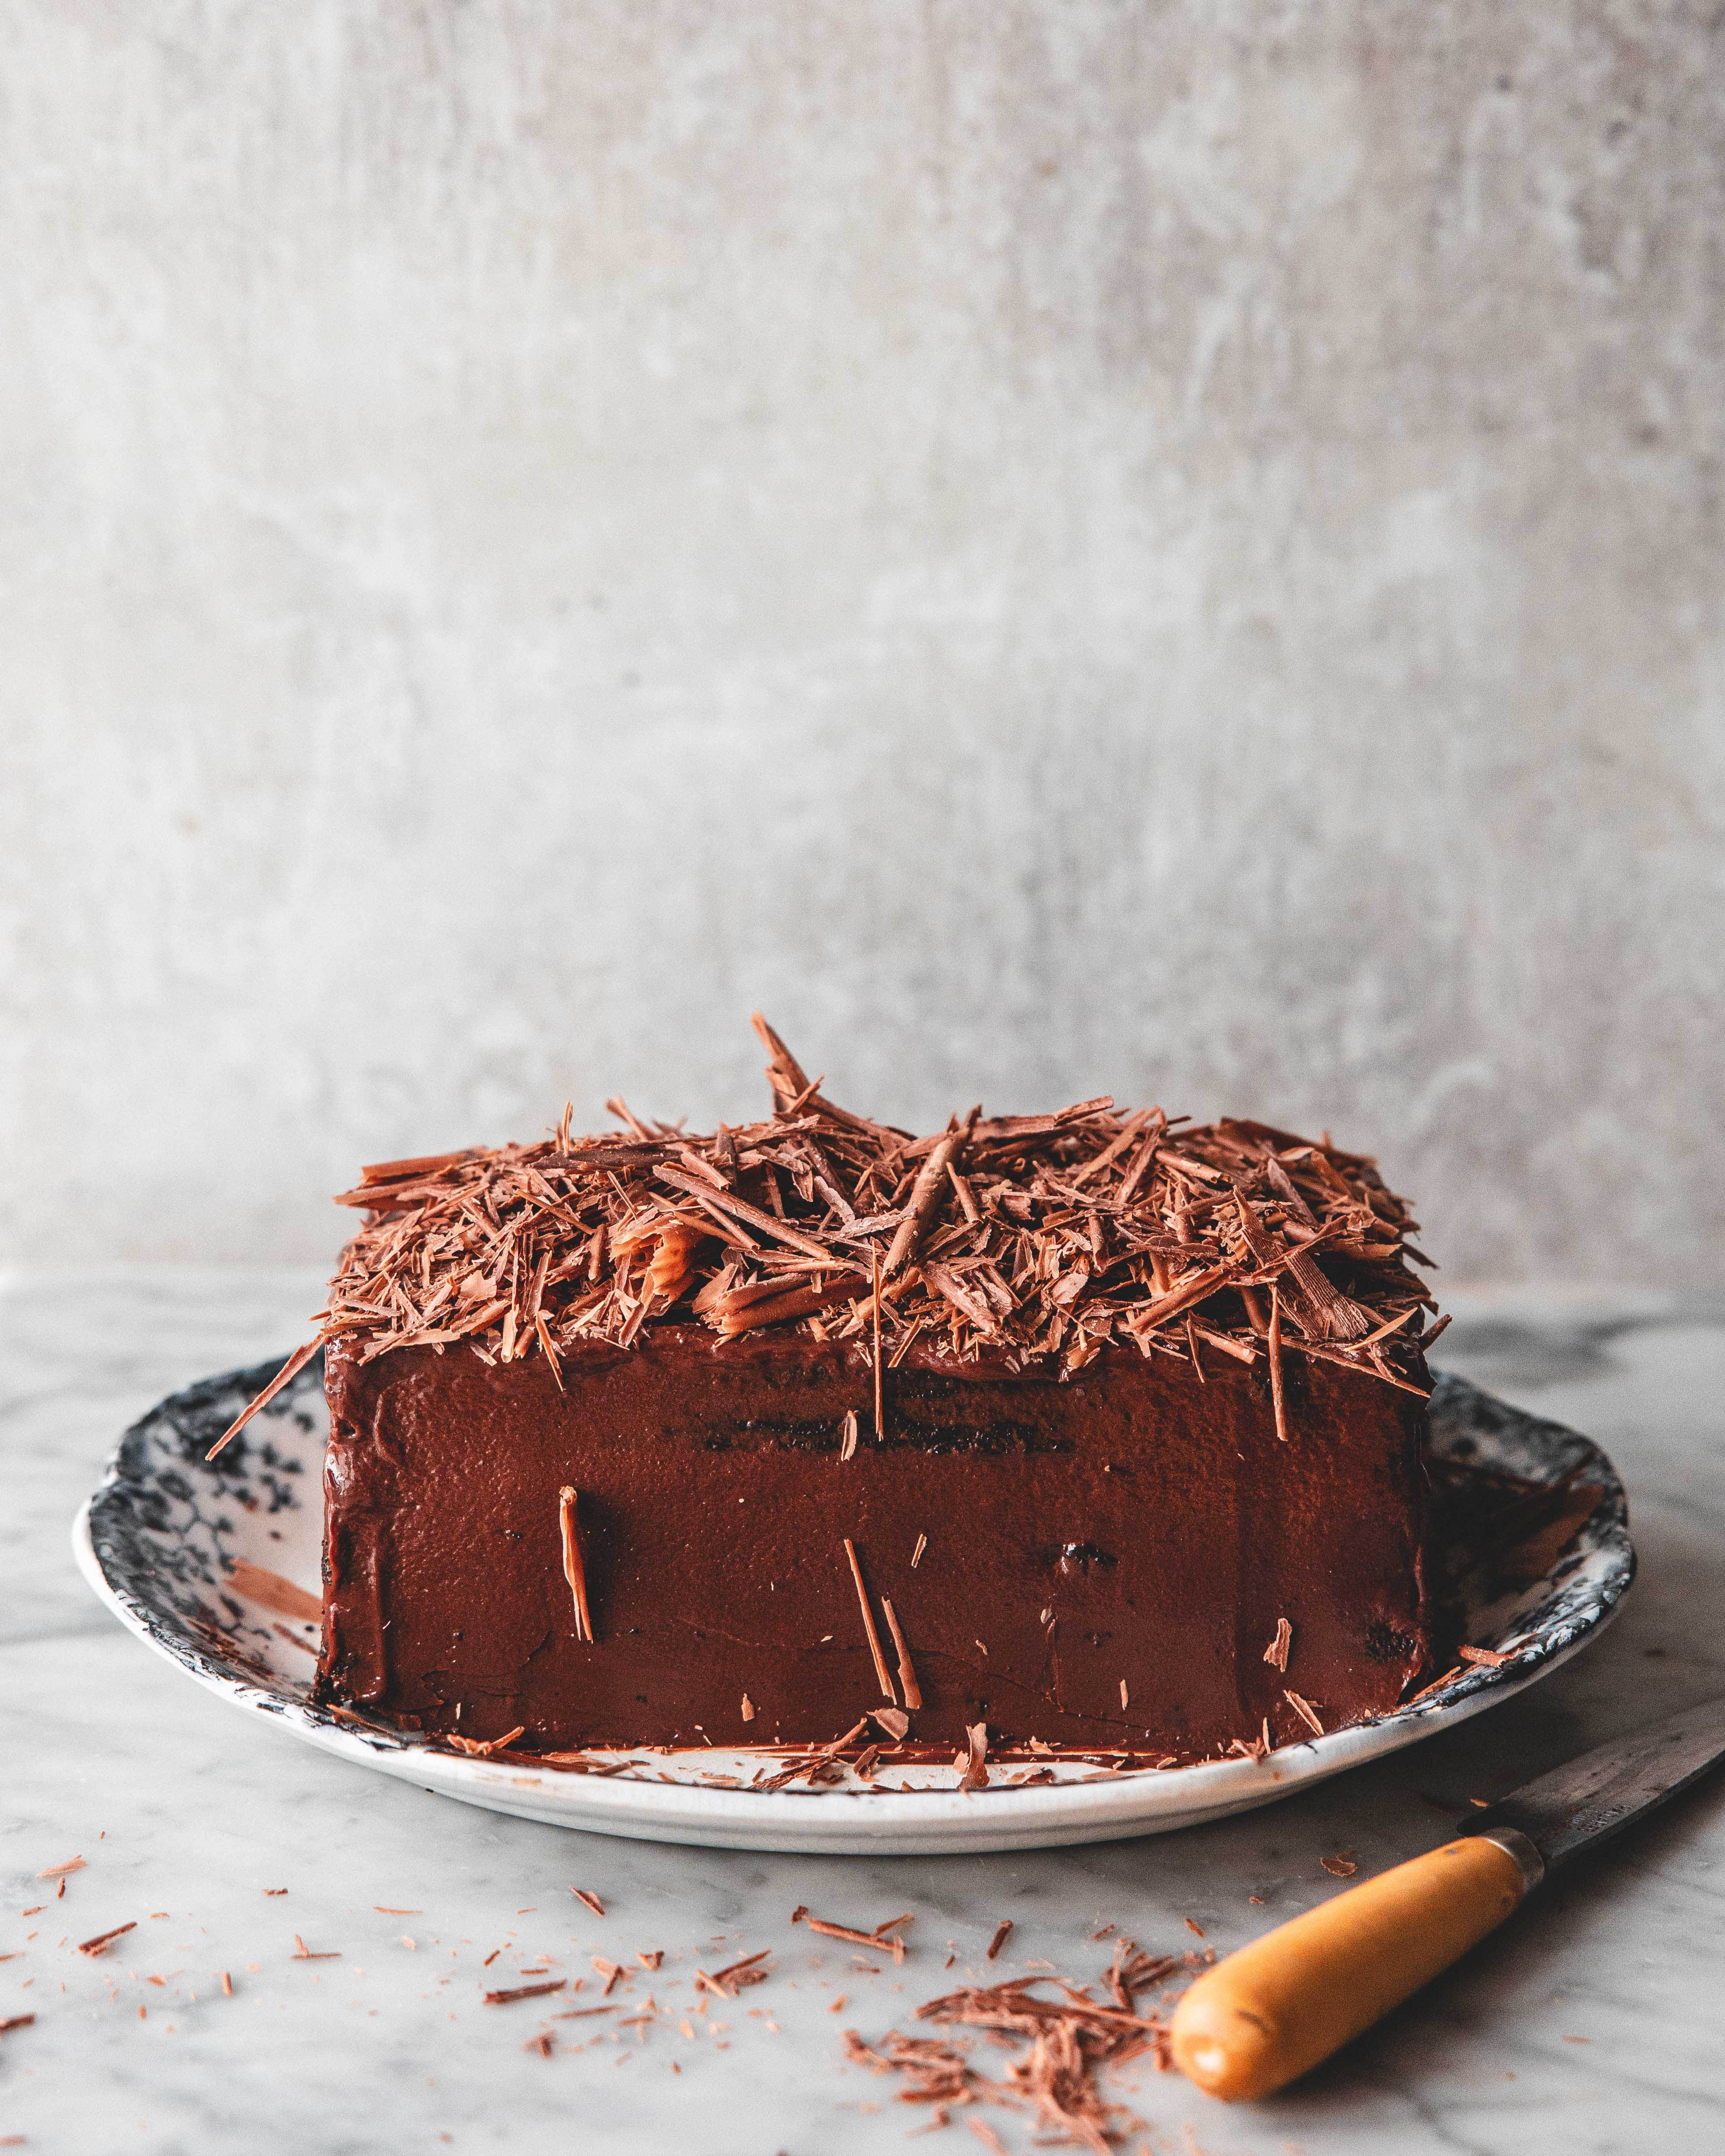
For the shavings, melt the chocolate and then spread very thinly either onto a marble slab or the back of a baking tray. If using a marble slab leave alone until the chocolate has lost all shine but not quite fully set. If using the baking tray pop the tray into the freezer for a couple minutes until the chocolate is in the same state, no longer shiny and almost set. Use a bench scraper, positioned at a roughly 45º angle to scrape the chocolate, creating lots of chocolate shavings. These will melt very quickly if held, so using the bench scraper, transfer to a small container and refrigerate until needed.
For the ganche, finely chop the chocolate and transfer to a small jug. Add the cream to a small saucepan and place over medium heat and bring to a simmer. Pour the cream over the chocolate and leave for a couple minutes before stirring to form a silky ganache. Leave for about 15 minutes or until slightly thickened. Pour the ganache over the cake and use a spatula to spread over the entire cake, covering in a thin layer. Remove the shavings from the fridge and generously scatter them atop the cake and then carefully press them onto the sides of the cake too.
Refrigerate the cake until ready to serve. It will keep for at least 2-3 days.
Thank you so much for this, very accommodating of you!
Thank you so much for the recipe!